There are two reasons we want to grease certain parts on the M1. The first reason is we require reliable function, the second reason is to reduce wear. The military was focused on reliable weapon function and less on long-term serviceability. The grease locations shown in the service manuals are designed to promote proper function. We’ll show you those locations first, and then add a few additional areas that should help reduce the wear and tear on your M1 Garand.
The military initially considered using oil as a lubricant but field trials showed that the oil quickly migrated out of the areas needing lubrication and weapon stoppages became frequent. The oil was also easily washed out of the M1 during heavy rains. A quality grease like Mobil 1 synthetic grease has an operating range of -40F to over 300F and will work in any condition you can imagine being in with your M1 Rifle.
Minimum Areas to Grease:
Most of the areas being greased can only be accessed with the rifle field stripped. It’s good practice to avoid field stripping your rifle unless absolutely required. When properly greased these hard-to-reach areas only need to be serviced once a year or every 1000 rounds; whichever comes first. The rifle can be cleaned without field-stripping and those areas where the grease was cleaned off in the process can be accessed without taking the rifle apart.
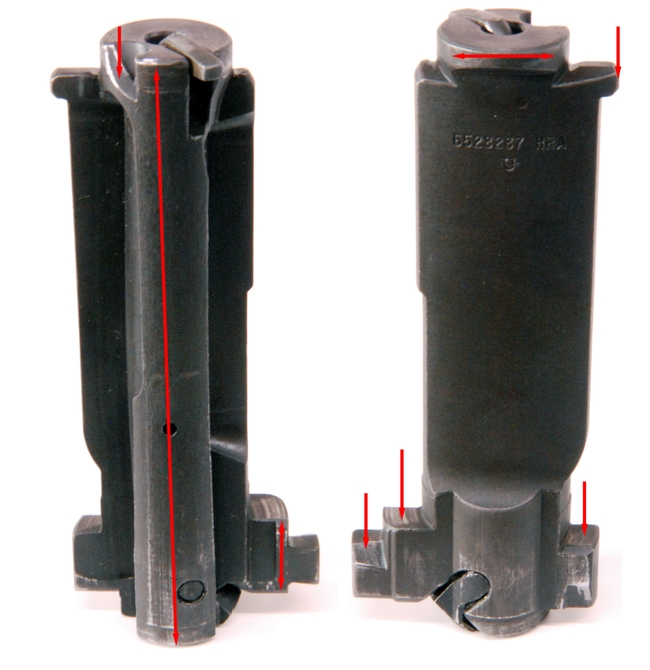
1 The first part we’ll want to grease is the bolt. The bolt has several areas that need to be greased. These areas are broken down into two sections. The first is the locking and cam lugs. The second is the bearing surfaces. Apply a thin layer of grease to the areas shown below. A drop of oil can be applied to the hole on the bottom of the bolt which leads to the ejector spring.
2 Next turn your attention to the hammer. The hammer does NOT need to be removed from the trigger assembly to grease. Apply a thin layer of grease to the areas shown below. A drop of oil on the hammer pin can help reduce wear.

3 The Op-Rod has several areas that need to be greased. Apply grease to the four bearing surfaces shown below and to the internal cam track. Be sure to apply grease to the tab. The tab on the Op-rod is subject to significant wear when not properly lubricated.

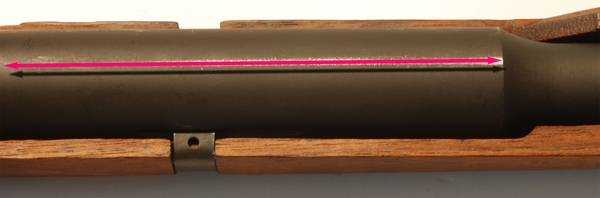
4 Move next to the underside of the barrel. The Op-Rod will slide along this surface as shown below. Insufficient lubrication here often leads to short stroking malfunctions. Apply a thin layer of grease to the barrel about quarter-inch wide, centered on the bottom edge of the barrel as shown below.
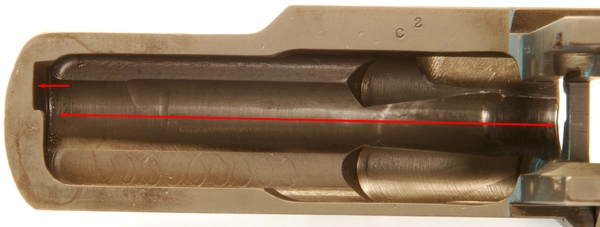
5 The receiver is the foundation for the moving parts on the M1; as such it contains the surfaces that the moving parts slide on. Pay attention to the areas on the receiver where the bolt and operating rod slide. The locking lugs and rails as shown below should be greased. Be sure to grease in the track where the operating rod tab slides.

6 Flip the receiver upside down and apply a thin layer of grease to the channel where the bolt slides into. Apply a small amount of grease to the cutout for the firing pin tang.
7 Next we want to lubricate the operating rod spring. If your M1 rifle has a metallic tinny sound when cycling the op-rod; this is a good indicator that additional grease is needed. The easiest way to lubricate the operating rod is to put a glob of grease in a latex-gloved hand and pull the spring through the hand several times. This will apply an even coat of grease over the entire length of the spring. Apply some grease to the opening in the operating rod where the spring enters before re-assembling.

Additional Areas to Grease:
The following areas can be greased to reduce wear on the parts. These areas generally can be operated without lubrication. Using some lubrication on these parts can significantly reduce wear over time. As parts become harder to locate, we want to maximize the functional life of each one.
1 The op-rod catch can be lubricated where shown. This will reduce wear and help assist the bolt closing when a clip is inserted.
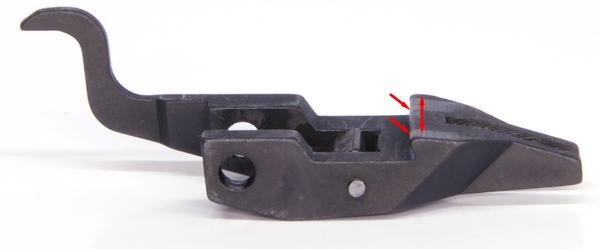
2 Apply some grease to the area shown on the bullet guide. This will reduce wear on the guide when it acts on the accelerator on the operating rod catch. Wear on this part can lead to timing issues.

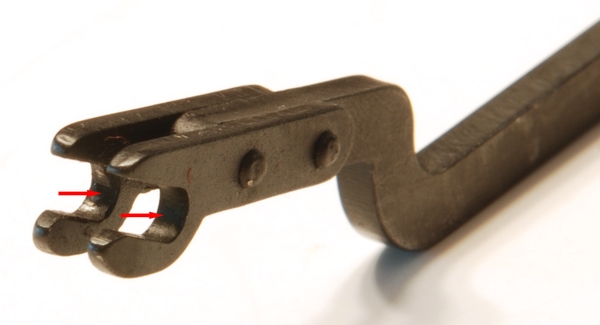
3 A thin layer of grease can be applied to the hooks on the follower rod. This helps reduce wear on the hooks and the lugs on the follower.
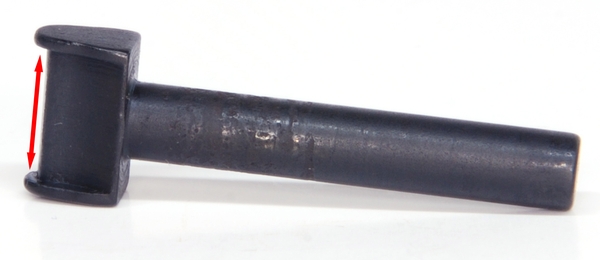
4 The nose of the hammer spring plunger can be lightly lubricated to reduce wear on the nose and the hammer. Be sure to also grease lightly the hammer spring.
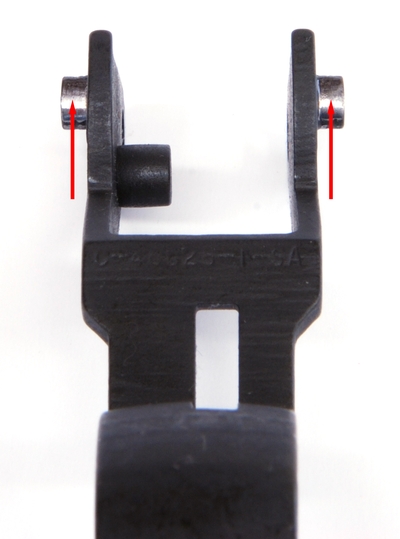
5 Finally, apply some grease to the locking lugs on the trigger guard. These lugs are under significant load and wear quickly. A little grease helps facilitate lockup and reduces wear.
Finishing Up:
When properly lubricated your M1 rifle should operate without issue. Most of the areas shown above do not require frequent cleaning. Field stripping the rifle causes wear to the trigger guard lugs and the lockup of the rifle. This can hurt the accuracy potential of the rifle. If your rifle is properly lubricated and is malfunctioning you may wish to read the following article. [M1 Garand Malfunction Article]
The external areas of the receiver can be wiped clean and easily serviced without breaking down the rifle. Before assembling the rifle apply a few drops of oil to the various internal pins to reduce wear. Wipe down any external metal surfaces with an oiled patch to help prevent surface rust when in storage.

Useful. I’m pretty sure there are a few places on that list I’m not lubing.
LikeLike