
When it comes to drawing your firearm for defensive shooting, there are a lot of techniques being taught. Some people want no steps, while others want long complicated steps in presenting the firearm. I have always been middle of the road when it comes to the steps of the draw. The main goal in the draw should be using the most efficient movement to get the firearm into the fight. I have always used a six (6) step method to teaching the draw. The benefit of using these key steps is consistency in the draw for Duty Carry or Concealed Carry.
1.) Grip
2.) Clear
3.) Lock
4.) Grab
5.) Punch
6.) Trigger Press
In each step there are several things going on that you need to incorporate. It is important to remember, depending on the encounter, you may not complete all six (6) steps. Most deadly force encounters (shootings) happen in low light, at extremely close distances, from three (3) to seven (7) feet. Incorporating these steps in the draw will address close range as well as longer range engagements. I will discuss the importance of each step.
The Draw:
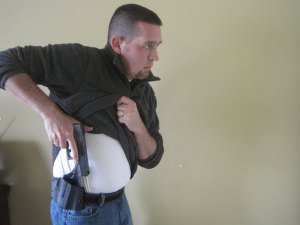
Grip – This first step is critical as it sets the entire tone of the engagement. The outcome could be won or lost right here. Several things are going on at the same time: Support hand is clearing clothing and comes to the center of the chest (Grab position). Gun hand breaks holster retention and acquires a positive, high in the web of hand grip, with trigger finger indexed along the side. Movement should also start happening at the same time, (i.e. stepping off line or back).


Clear – Keeping the support hand on your chest, clear the firearm from all gear and clothing. This is the time that you will be taking the safety off of a firearm that has a safety (i.e. 1911, HK USP, Berretta). Continue your movement off line.

Lock – Bring the firearm up presenting the firearm towards the threat. This is a close quarters encounter shooting position (arms length). It is important to keep your support hand on your chest incase you have to fire. This will help you avoid putting rounds through your own hand. If you are not shooting from this position quickly transition to Grab.


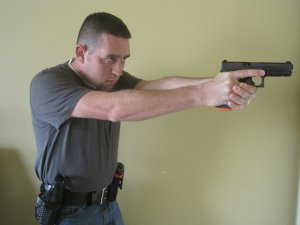
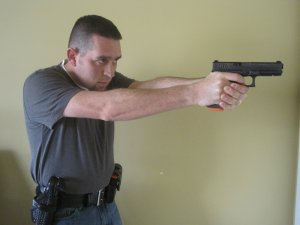
Grab – Push the firearm forward and towards the center of your body. At the same time come underneath the trigger guard with the support hand and acquire a high ready two handed grip. The firearm should be high enough that your peripheral vision should start to pick up the front sight. Having the firearm in this position of the draw is critical to set you up for the next step.
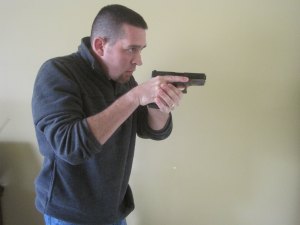
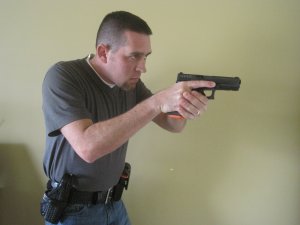
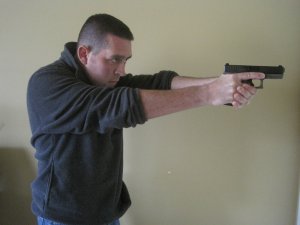
Punch/Sights – From the Grab position push the firearm towards the threat while acquiring your sights. This should be a straight forward motion like a punch. Pushing the firearm straight out will avoid fishing or bowling of the firearm and sights. This straight motion from the Grab will help you pick up the sights faster. At this point your movement (stepping off line) should be ending, as you are preparing to fire.
Trigger Press – Once you have your sights on target, move your trigger finger from indexing to the trigger. All of the steps mean nothing if you mash the trigger and don’t get the rounds to hit. Use good trigger fundamentals and press.

These steps are a guide to help you in your training. All of the steps should be used in one fluid motion when presenting the firearm from the holster. The only time you should think about the steps is when you are going to shoot from one of the Lock, Grab or during the Punch steps. Mix it up during your training. I had a fellow officer who would regularly train firing from the Lock position through the Punch, while moving off line, from close quarters.
Close Quarters Encounter:
Lock – If you have to fire from this position, slightly cant the firearm away from your body, rock back a little to make sure your rounds are contacting center mass. Canting the firearms slightly will ensure the slide cycles properly, especially if multiple rounds are needed.

Conclusion:
I feel, in the civilian Concealed Carry field, not enough attention is focused on close quarters encounters. Remembering the important steps in the draw, Lock, Grip and Punch are important fundamentals. You are more likely to be stabbed than in a gun fight and that means close range. The steps will help you identify shooting skills you may need in protection of your family at home. In your house you will more than likely be at very close range to a suspect. Use the high ready Grab to move in your house or pull it back to Lock if you have to push someone away and then shoot.
Duncan

I wouldn’t recommend disengaging the safety until the Lock step, or at least until the muzzle has swung well forward of your feet, your friend’s feet, etc.
LikeLike