
by: German A. Salazar
There is no shortage of concentricity checking tools on the market today and it seems new ones keep coming to market so a quick survey of what we look for in a concentricity tool might be useful. I don’t intend to cover every tool available, after all, this is all done on my own time and budget! However, I have three concentricity checking tools and a comparison of their features and ease of use might be useful for someone contemplating buying this type of tool. The three tools are: the old Sinclair, which is a traditional V-block and dial indicator tool; the Bruno’s tool, a high quality unit which has some interesting features; and the NECO tool which is really a very adaptable case checking tool, not just concentricity although we will limit this article’s coverage to concentricity.
This article does not address the question of the accuracy effect of greater or lesser concentricity, that’s a topic for another day (if ever). We are simply concerned with the accuracy, ease of use, limitations and other features of the three tools covered. It’s up to you to decide which one, if any, is worth your time, money and effort. I have all three and use them at different times for different projects; to me, all are worthwhile, but I’m a tool hoarder anyway. Let’s have a look at them individually.
Sinclair (old model)
The old Sinclair is a very simple, well made tool which is very intuitive in design and use. Unfortunately it has been discontinued and I haven’t tried the replacement model so I will focus on the old model of which there are thousands in use and sometimes appear for sale in the classified ads of the shooting sites.
The tool consists of a V-block on which the cartridge case rotates, a back plate to keep the case in a fixed position and a probe-type dial indicator mounted on a support tower. The case is rotated on the V-block while maintaining slight downward and rearward pressure to keep the base down and bearing against the back plate. In practice this is very easy to do, requires almost no conscious effort and yields consistent results. To adjust for different length cases or to go from checking case neck concentricity to seated bullet concentricity, you simply loosen a lock screw on the support tower, slide the tower to the appropriate position and continue. If the indicator needs to be raised or lowered, it too is adjusted through a simple lock screw. Really, this is the simplest possible tool to use and it works well.
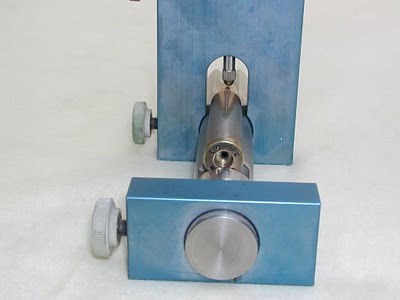
There are a couple of points to watch out for with the Sinclair tool. The first, which is common to all of these tools is to keep the V-block clean as it has a tendency to accumulate a bit of grunge and that can have a small effect on readings. The other is that the smoothness and perhaps accuracy of the tool can be affected by irregularities on the case base, including from the primer. I generally prefer to remove the primer with a decapping die prior to using the tool on fired but unsized brass. If the case has some nicks and gouges on the rim, such as a semi-auto’s extractor might cause, it’s best to dress these down before checking runout.
The Sinclair is supplied with a 0.001″ indicator which is accurate enough for our needs, but the lines on the indicator can be tough to read, after all, we’re looking at movement of about 0.002″ on average and those are small, closely spaced lines. Any dial indicator with the right stem length can be substituted by the user and in some cases that might be worthwhile, especially if really precise readings are desired. There are dial indicators with 0.0005″ gradations that might make life a bit easier given the low total displacement we are looking at in the case concentricity inspection process.

I’ve always liked the fact that the old Sinclair tool does not support the neck of the case. Intuitively, if we’re looking at neck to case body concentricity, we should be holding one part and examining the other – or so it would seem. That may not be entirely correct, as I’ve discovered, but it has a certain appeal and it isn’t entirely wrong either. In practice, the indicator probe resting on the unsupported neck does a good job as long as the pressure isn’t excessive and the case is rotated with consistent downward and rearward pressure. There’s very little not to like about the old Sinclair tool, after all, it’s simple, it works reasonably well and it’s easy to adjust. It wasn’t too glamorous, but it sure didn’t need to be discontinued. I’ve used mine for over 20 years when checking new brass or die setups; it’s quick, handy and has always been close by on the workbench.
https://web.archive.org/web/20150318051008oe_/http://widget-7a.slide.com/widgets/slideticker.swf
I suspect that Lester Bruno doesn’t need much of an introduction around here. As one of the world’s best Benchrest shooters, Lester knows accuracy and Lester’s business is providing us will all of the things we need, large and small, to pursue our accuracy goals. I’m a frequent visitor at Bruno’s, maybe even the reason Amy put up that “No Loitering” sign, I don’t know for sure… Shortly after I posted the article on two-step sizing and concentricity, Lester suggested that I try one of the concentricity tools that he makes and sells. Fair enough, I thought, a new tool and it looks very nice, let’s give it a go. To be honest, it seemd a bit pricey and compared to some other tools, it is – but I think it’s worth the price for the use I give it and I’m glad I went for it.
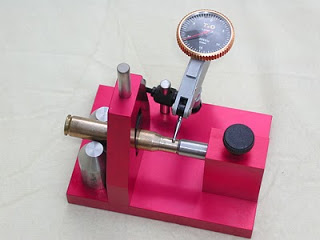
Visually the Bruno tool is a gem, the anodizing is bright, the polished pieces are well done and it uses a high quality lever-arm test indicator with 0.0005″ gradations which allows for very precise readings. My first impression, however, was that it might be too small for some of the work I do, especially the .30-06. It really looks like it’s scaled for the 6PPC, or maybe I thought that because it comes from Lester. Well, this was one of those ocassions when I was quite happy to be wrong, it easily handles the .30-06 and larger cases as you can see in the pictures.
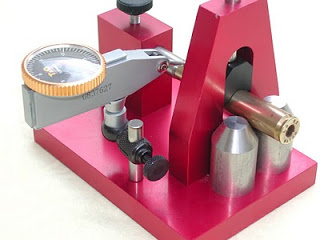
Basic adjustment for case length is simple enough: loosen a lock screw on the tapered case mouth/bullet support and slide it to the desired location. The more challenging part is moving the indicator to the new location. The indicator is mounted on a tool post and while the holder is sufficiently adjustable, it is not easily adjustable. Frankly, it takes a bit of work to properly locate the indicator, but once that’s done (a matter of a few minutes at most) it will hold its setting perfectly. The rear of the case is supported by two tapered posts. In the middle there is a central tower with an interesting case support: a vertical rod with a contoured case-riding piece that presses lightly down on the case to keep it from tipping upward from the finger pressure at the rear – quite clever and effective. The case mouth rides in a horizontal tapered post which also has a central hole in which the bullet tip rides when measuring runout on seated bullets.
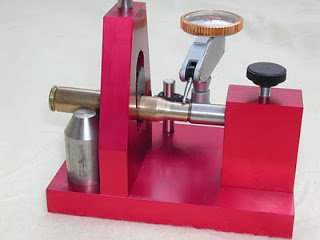
Using the Bruno tool isn’t very different from the Sinclair, you maintain a slight forward pressure as you rotate the case. However, the design of the Bruno with the end of the case hanging in the air makes it much easier to turn it consistently through a rotation. Bring the central case-rider to bear on the case tiny bit of downward pressure prior to starting; that keeps the case rotating smoothly but there is no need to press on the post while actually rotating. The 0.0005″ indicator reads smoothly and really gives a better visual indication of runout than the 0.001″ indicator that I have on the Sinclair. In part this is due to the smaller, more precise contact point of the lever arm indicator used on the Bruno tool. I should also mention that reading the Bruno is a lot easier since the indicator faces up, whereas on the Sinclair I have to crane my neck to look at the forward-facing indicator. The Sinclair is a good tool that has given me many years of good service, but the Bruno is a better setup for real precision.
When measuring a seated bullet, the Bruno is simple and intuitive in use: adjust the length of the tip holder, set up the indicator to bear on the ogive and get to it. I usually slip a Sinclair hex nut comparator over a bullet to make a faint mark right at the ogive to help me in determining where to set the indicator. I then set the indicator tip about 0.010″ behind the mark so that I am definitely on the bearing surface even if some of the bullets have a bit of variance. It’s a handy way to get set up consistently from one session to another.
Reading an empty case requres a little more effort, but not much. When I began using the tool I was concerned because it consistently showed more runout on empty cases (fired or sized) than the Sinclair. Not only that, but the readings were also kind of jumpy and didn’t seem reliable. After some examination I understood the reason for that behavior: the case mouths had small dings or burrs generated in the extraction and ejection process (my rifles have normal plunger ejectors with enough spring power to get the case out of the rifle). These little dings and burrs don’t ride smoothly on the tapered case mouth holder and cause the odd readings. All it takes to cure that is a very light touch-up with a chamfer/deburring tool to get a nice, even chamfer and a quick rub on some fine steel wool. Once the chamfer in the case mouth is even and smooth, the readings are in line with those of the Sinclair tool, although easier to read to a fine level of precision due to the finer gradations on the indicator and its horizontal mounting. The Bruno tool has become my principal tool for checking the concentricity resulting from different die setups and for comparing the results of one loading process to another; I simply have more confidence in my ability to get an accurate reading from it.
The NECO tool is a very versatile case checking tool, a development of Creighton Audette’s original design. I’ve written about it before, covering what I consider to be its primary function: checking case body thickness variance (click here for the article). I am perfectly satisfied with that use for the tool and have never before used it for checking neck or bullet concentricity. However, the tool comes with a very detailed instruction manual that shows how to set it up for a number of different functions so I decided to give it a try.
Following the instructions to set it up for checking loaded bullet concentricity only took a couple of minutes. Once that was done, I took a piece of factory ammo and checked the runout on the bullet, comparing it to the results from the other tools. The NECO and Bruno tool gave the same reading on this piece, right at 0.0025″ and it repeated well. The Sinclair showed more runout and did so in an irregular, sort of bumpy manner. I suspect that the case may be slightly irregular and all the contact in the Sinclair’s V-block made it jump around. I have more confidence in the readings from the Bruno and NECO in this case.
The NECO shares some of the Bruno’s virtues in being read easily from above as well as ease of case manipulation. My old Craftsman indicator is a 0.001″ model and not as precise as the one that comes on the Bruno, but it could be replaced easily enough. The indicator that came on the NECO didn’t funtion properly when I got the tool. I sent it to NECO and they replaced it with one that works well but by then I’d mounted the Craftsman on it and it has stayed on because it came out of my father’s tool box and is a nice reminder of him when I use the tool.
Case neck concentricity is the other half of our test and unfortunately, the NECO just didn’t fare well at all here. The instruction book doesn’t show a setup for case neck concentricity checking and I think that omission was not accidental. The picture at left shows how I arranged things for checking the necks with the sliding V-blocks arranged to reasonably support the case and the case mouth in the stepped stub. However, I wasn’t able to get consistent support from the front V-block despite trying various locations and using both sides of the block (it has different size V’s on either side). Readings were very jumpy, inconsistent and large, leading me to believe that the whole setup was moving and the readings were completely invalid. I won’t say the tool can’t be set up for this purpose, but I wasn’t able to do it and my interest in spending hours trying to figure it out is very low because I have the other two tools anyway and I prefer to leave the NECO set up for checking case wall thickness variance, a function for which it is uniquely suited.
Concluding Thoughts
After many years of service, I’ve decided to retire the old Sinclair and make the Bruno tool my primary concentricity tool. It is simply a better made, easier to use, more accurate tool and those are the qualities I value in any tool. I’ll have to add a small step in prepping the case mouths when reading case necks, but I think that’s a worthwhile price to pay for the increase accuracy and convenience. The NECO will remain dedicated to case wall thickness checking and perhaps some more exotic things like case head squareness; regular concentricity checking isn’t it’s strong suit, nor does it need to be because it is so good at the other things that no other tool does. I’m glad I stopped in at Brunos that day, though I must say that the fine for loitering seems to be increasing!

I think I need a concentricity gage. A couple of my loads are very accurate and consistent…except for the occasional uncalled flier. Since I’m checking and controlling most of the other factors, I’m thinking this one is biting me.
LikeLike